I’ve installed solar systems on four campervans. The first generated maybe 30% of what the marketing claimed. The second used a controller that wasted 25% of the available power. The third finally works properly, but it took me £340 in wasted components and two complete reinstallations to get there.
Between those three solar installations, I’ve wasted £115 on a panel that was basically a decorative roof ornament, £70 on controllers that threw away power, and countless hours troubleshooting why my “500Wh per day” panel was giving me 150Wh on a good day.
After 30 years as a maintenance manager, you’d think I’d understand electrical systems. And I do – for mains voltage in buildings. But solar on a moving vehicle in the UK climate? That’s different. The marketing is mostly lies, the performance is weather-dependent, and nobody tells you that your £300 solar setup will generate basically nothing for four months of the year.
This guide is everything I wish someone had told me before I bought my first solar panel. Not the California desert performance figures. Not the “perfect world” calculations. The actual reality of solar power in the UK, what genuinely works, and how to avoid the expensive mistakes I made.
This guide covers everything about Solar Power For Campervans that I wish someone had told me before I bought my first solar panel.
Why Solar Isn’t Magic (But It’s Still Worth It)
Let me start with uncomfortable truth: solar panels in the UK will not give you unlimited free power.
What solar marketing says: “200W panel generates 1000Wh per day!”
What actually happens in the UK:
- Perfect summer day: 500-600Wh (60% of claim)
- Cloudy summer day: 250-350Wh (30% of claim)
- Winter day: 80-150Wh (10% of claim)
- Overcast winter day: 30-60Wh (5% of claim)
But: Solar is still brilliant. Here’s why I have it despite the limitations:
Summer (May-September):
- My 200W setup generates 50-70Ah daily
- My usage is 60-70Ah daily
- Result: Indefinite off-grid capability
- No need to drive for charging
- Campsite fees saved: £25/night x 15 nights = £375 per summer
Spring/Autumn (March-April, October-November):
- Generation: 30-50Ah daily
- Usage: 60-70Ah daily
- Result: Extends autonomy from 2 days to 3-4 days
- Less frequent driving needed
Winter (December-February):
- Generation: 10-25Ah daily
- Usage: 70-80Ah daily (heating)
- Result: Helps but doesn’t solve power needs
- Still need to drive every 2-3 days
Is solar worth it?
For summer camping: Absolutely. Pays for itself in saved campsite fees.
For year-round: Helps significantly but doesn’t eliminate charging needs in winter.
For weekend warriors: Maybe. Depends on how often you camp April-September.
My Solar Journey (The Expensive Education)
Van #2 (2020): The Disappointing Panel
System:
- 100W flexible panel: £90
- Cheap PWM controller: £25
- Total: £115
Marketing claim: 500Wh per day (4.2Ah @ 12V)
Reality:
- Best summer day: 180Wh (1.5Ah @ 12V)
- Average summer day: 120Wh (10Ah)
- Winter day: 40Wh (3.3Ah)
Why so poor?
- Flexible panel was cheap (15% efficiency instead of 18%)
- PWM controller wasted power (more on this later)
- Panel laid flat (not angled toward sun)
- I didn’t understand solar at all
Cost: £115 for system that barely helped. Lesson learned expensively.
Van #3 (2022): The Better Panel, Wrong Controller
System:
- 200W rigid panel (2x100W): £180
- “Better” PWM controller: £45
- Total: £225
Marketing claim: 1000Wh per day
Reality:
- Best summer day: 450Wh (37Ah)
- Average summer day: 320Wh (27Ah)
- Winter day: 100Wh (8Ah)
Much better! But still only 40-50% of marketing claims.
Why?
- Better panels (18% efficiency, rigid)
- But PWM controller still wasting power
- Didn’t understand MPPT vs PWM
- Still learned the hard way
After 1 year: Realized PWM was limiting me. Upgraded to MPPT controller (£85). Immediate improvement:
- Best summer day: 600Wh (50Ah) – 33% increase
- Average summer day: 450Wh (37Ah) – 40% increase
- Winter day: 140Wh (12Ah) – 40% increase
Lesson: Controller matters as much as panel quality.
Van #4 (2023-present): Finally Got It Right
System:
- 200W rigid panels (2x100W Renogy): £180
- Victron MPPT 75/15 controller: £85
- Proper installation with cable management
- Total: £265
Performance (18 months of data):
Summer (June-August):
- Perfect day: 650Wh (54Ah)
- Good day: 500Wh (42Ah)
- Cloudy day: 350Wh (29Ah)
- Average: 460Wh (38Ah)
Spring/Autumn (March-May, Sept-Nov):
- Perfect day: 480Wh (40Ah)
- Good day: 380Wh (32Ah)
- Cloudy day: 220Wh (18Ah)
- Average: 340Wh (28Ah)
Winter (December-February):
- Perfect day: 240Wh (20Ah)
- Good day: 180Wh (15Ah)
- Cloudy day: 80Wh (7Ah)
- Average: 160Wh (13Ah)
This is realistic UK performance. Still only 40-50% of marketing claims, but with proper MPPT controller, it’s actually useful.
Total wasted on learning: £115 (inadequate first system) + £70 (PWM controllers that wasted power) = £185
But knowledge gained: Priceless.
Understanding Solar Basics (The Boring But Essential Bit)
Skip this if you just want to be told what to buy. But understanding helps make better decisions.
How Solar Panels Actually Work
Solar panels convert sunlight to electricity using photovoltaic cells:
- Photons (sunlight) hit silicon cells
- Electrons get excited and move
- This creates DC current
- Controller regulates this to charge battery
Important: Panels generate voltage and current. Both matter.
Typical 100W panel specs:
- Voltage at maximum power (Vmp): 18-20V
- Current at maximum power (Imp): 5-5.5A
- Power: 100W (at peak conditions)
But your battery needs:
- Voltage: 14.4V for charging
- Current: As much as possible
The controller’s job: Convert 18-20V from panel to 14.4V for battery, while maximizing current.
Peak Sun Hours (Why Marketing Numbers Are Lies)
Panels are rated at “1000W per square meter” of sunlight. This is called “Standard Test Conditions” (STC).
STC conditions:
- Bright sun, directly overhead
- 25°C panel temperature
- No clouds, no atmosphere interference
- Perfect alignment
Reality in the UK:
- Sun is never directly overhead (we’re at 51-58°N latitude)
- Clouds constantly
- Cool temperatures (good) but low sun angle (bad)
- Panels flat on roof (not angled)
Peak sun hours in UK:
Summer:
- South England: 4-5 hours per day
- Scotland: 3-4 hours per day
Spring/Autumn:
- South England: 2.5-3.5 hours per day
- Scotland: 2-3 hours per day
Winter:
- South England: 1-1.5 hours per day
- Scotland: 0.5-1 hour per day
Example calculation:
200W panel x 4 peak hours = 800Wh theoretical maximum
But:
- Panel efficiency losses: -15% = 680Wh
- Controller losses (PWM): -25% = 510Wh
- Controller losses (MPPT): -7% = 633Wh
- Temperature losses: -5% = 600Wh
- Wiring losses: -3% = 582Wh
- Flat mounting (not tilted): -15% = 495Wh
Real-world output: 495Wh on perfect UK summer day
This matches my experience exactly.
Temperature Effects
Counterintuitive: Solar panels work BETTER in cold weather.
Panel efficiency by temperature:
- 25°C (STC): 100% rated output
- 15°C (UK summer): 105% rated output
- 5°C (UK winter): 110% rated output
- 45°C (hot roof in sun): 85% rated output
Why this matters:
Summer: Panel heats to 50-60°C on roof. Loses 15-20% efficiency to heat.
Winter: Panel stays 5-15°C. Gains 5-10% efficiency from cold.
But: Winter has fewer sun hours and lower sun angle, so still generates less overall.
My observation: Coldest clearest winter days (January, Scotland, -2°C) generate amazing power per sun hour. But only 1.5 hours of useful sun, so total still low.
Solar Panel Types: What Actually Matters
I’ve used flexible and rigid panels. Here’s what you need to know.
Monocrystalline vs Polycrystalline
Monocrystalline:
- Made from single silicon crystal
- Efficiency: 18-22%
- Look: Black, uniform color
- Cost: £90-£150 per 100W
- What I use
Polycrystalline:
- Made from multiple silicon crystals
- Efficiency: 15-17%
- Look: Blue, mottled appearance
- Cost: £70-£120 per 100W
- Older technology
Efficiency matters in vans: You have limited roof space. Higher efficiency = more power per square meter.
My recommendation: Buy monocrystalline. 18%+ efficiency minimum. The extra £20-30 per panel is worth it.
Rigid vs Flexible Panels
Rigid panels:
Pros:
- Higher efficiency (18-21%)
- Longer lifespan (20-25 years)
- Better heat dissipation (air gap under panel)
- Cheaper per watt
- More durable
- Easier to replace if damaged
Cons:
- Heavier (6-7kg per 100W)
- Need mounting brackets
- Higher profile (more visible, wind resistance)
- Harder to fit curved roofs
Flexible panels:
Pros:
- Lightweight (2kg per 100W)
- Stick directly to roof (low profile)
- Fit curved roofs
- Stealthier (less obvious)
- Easier installation
Cons:
- Lower efficiency (15-17%)
- Shorter lifespan (5-8 years)
- Can’t dissipate heat well (stick to hot roof)
- More expensive per watt
- Can’t be removed easily
- Delamination issues common
My experience:
Van #2: Flexible 100W panel (£90)
- Stuck to roof with 3M tape
- After 2 years: Output dropped to 60% (delamination suspected)
- Hot in summer (panel temperature 65°C+)
- Disappointing performance
Van #3 & #4: Rigid panels (2x100W, £180 total)
- Mounted on brackets with 10mm air gap
- After 3 years: Still performing at 95%+ of original
- Cooler (air circulates underneath)
- Much better performance
Verdict: Buy rigid panels unless you absolutely need flexible for curved roof. Rigid are better in every way except installation complexity.
Best rigid panels for vans:
Budget (£80-£110 per 100W):
- Renogy 100W: £95
- ECO-WORTHY 100W: £85
- Good performance, decent warranty
Mid-range (£110-£140 per 100W):
- Victron 100W: £125
- Better efficiency, longer warranty
Premium (£150-£200 per 100W):
- SunPower: £180
- 22% efficiency (highest available)
- Only worth it if roof space is extremely limited
I use Renogy 100W rigid panels (2x, total £190 in 2022). They’re still going strong, perform well, good value.
Panel Sizing: How Much Do You Need?
Step 1: Calculate daily usage
From my battery guide, my usage:
- Summer: 65Ah daily
- Winter: 75Ah daily
Step 2: Decide on solar contribution
Conservative (50% from solar in summer):
- Need: 32-38Ah from solar
- Panel: 100W minimum
Balanced (80% from solar in summer):
- Need: 52-60Ah from solar
- Panel: 200W minimum
Aggressive (100% from solar year-round):
- Impossible in UK without massive array
- Even 400W won’t cover winter usage
My choice: 200W panels. Gives me 100% coverage summer, 40-50% coverage winter.
Space constraints:
100W panel: Typically 1000mm x 670mm (0.67 sq m) 200W panel: Two 100W panels = 1.34 sq m
Check your roof space before buying.
My Transit Custom roof: 2.5m x 1.7m = 4.25 sq m available. 200W of panels uses 31%. Plenty of room.
My recommendation by usage:
Light use (weekend warrior, 30-40Ah daily):
- 100W panel: £95
- Adequate for summer, minimal winter help
Regular use (60-70Ah daily):
- 200W panels: £180-190
- Good coverage summer, helps significantly in winter
- This is what I have
Heavy use (80-100Ah daily):
- 300W panels: £270-300
- Better winter performance, full summer coverage
- Requires good roof space
Full-time (100Ah+ daily):
- 400W+ panels: £360-450
- Even this won’t cover UK winter completely
- But maximizes solar contribution
Solar Controllers: PWM vs MPPT (This Cost Me £70)
The controller is as important as the panel. I learned this expensively.
PWM (Pulse Width Modulation)
How it works:
- Directly connects panel to battery
- “Pulses” connection on/off rapidly
- Battery voltage pulls panel voltage down
- Current limited by battery voltage
Example:
- Panel produces: 18V at 5.5A = 99W
- Battery needs: 14.4V
- PWM connects panel directly
- Panel pulled down to 14.4V at 5.5A = 79W
- Lost: 20W (20% of available power)
Pros:
- Cheap (£20-£45)
- Simple
- Reliable (no complex electronics)
Cons:
- Wastes 20-30% of panel power
- Inefficient
- Not worth the saving
My experience (Van #2 & #3):
Van #2: Cheap PWM (£25)
- 100W panel giving maybe 70W maximum
Van #3: “Better” PWM (£45)
- 200W panels giving maybe 140-150W maximum
Both wasted huge amounts of power.
Verdict: Don’t buy PWM controllers. The £30-40 saving costs you 25% of your solar power forever. False economy.
MPPT (Maximum Power Point Tracking)
How it works:
- Monitors panel voltage and current
- Finds “maximum power point” (optimal voltage for maximum watts)
- Converts higher voltage to lower voltage with higher current
- Maintains battery at correct charging voltage
- Adjusts constantly for changing conditions
Example:
- Panel produces: 18V at 5.5A = 99W
- Battery needs: 14.4V
- MPPT converts 18V to 14.4V
- Current increases: 99W ÷ 14.4V = 6.9A
- Controller efficiency: 93-97%
- Delivered: 92-96W (93-97% of available power)
Pros:
- 25-40% more power than PWM (especially in winter)
- Smart (adjusts to conditions)
- Proper battery charging (multi-stage)
- Can combine multiple panels
- Temperature compensation
- Battery type profiles (AGM, Lithium, etc.)
Cons:
- More expensive (£60-£150)
- More complex (more to go wrong)
My experience (Van #4):
Upgraded from PWM to Victron MPPT 75/15 (£85).
Immediate results:
- Same 200W panels
- Output increased 30-40% instantly
- Summer: 37Ah → 50Ah per day
- Winter: 8Ah → 12Ah per day
18 months later: Still performing brilliantly. Best £85 I spent.
Popular MPPT controllers:
Budget (£60-£90):
- Renogy Rover 20A: £65
- EPSolar 20A: £75
- Basic features, adequate performance
Mid-range (£85-£130):
- Victron MPPT 75/15: £85 (what I use)
- Victron MPPT 100/20: £115
- Renogy Rover Elite 40A: £120
- Bluetooth monitoring, better features
Premium (£150-£200):
- Victron MPPT 100/30: £165
- For 300W+ systems
- Professional grade
Controller sizing:
Match controller to your panel wattage and system voltage:
For 12V system:
- 100W panel: 10A controller minimum (I’d buy 15A)
- 200W panel: 15A controller minimum (I’d buy 20A)
- 300W panel: 25A controller minimum (I’d buy 30A)
- 400W panel: 30A+ controller
Voltage rating:
- 75V controllers: Handle up to 75V input (adequate for 1-3 panels)
- 100V controllers: Handle up to 100V input (better for multiple panels)
I use Victron MPPT 75/15:
- Handles my 200W panels (36V maximum in series)
- 15A output (actually draws 12-13A maximum)
- Bluetooth app (monitor performance)
- Perfect for my system
Verdict: Buy MPPT. Victron 75/15 (£85) for 100-200W systems. Worth every penny over PWM.
Installation: How to Actually Mount Panels
This is where it gets practical. Tools out, let’s mount some panels.
Roof Preparation
Step 1: Clean roof thoroughly
- Wash with soapy water
- Degrease with isopropyl alcohol
- Remove any rust or loose paint
- Let dry completely (24 hours)
Step 2: Plan layout
- Consider: Roof vents, windows, solar panels, roof bars
- Leave access to vent for maintenance
- Consider cable routing
- Mark positions with tape
Step 3: Check roof structure
- Where are the ribs/supports?
- Mount brackets into solid structure
- Don’t just screw into thin roof skin
Mounting Methods
Method 1: Brackets (What I Use)
Components needed:
- 4x mounting brackets per panel (£25-35 per set)
- Sikaflex 512 sealant (£12-18 per tube)
- Self-tapping screws (M6 or M8)
- Penny washers (spread load)
Process:
- Position brackets:
- Four corners of panel
- On roof ribs/supports
- Mark holes with pencil
- Drill pilot holes:
- 3mm pilot hole
- Check you haven’t gone through roof lining (I did this once, in van #2, had to patch ceiling)
- Apply Sikaflex:
- Generous amount on bracket base
- Around screw holes
- Don’t be shy – this is waterproofing
- Fix brackets:
- Self-tapping screws with penny washers
- Tight but not overtightened (can crack roof)
- Sikaflex squeezes out (good – wipe excess)
- Let cure:
- 24 hours minimum before mounting panel
- 48 hours before driving
- Mount panel:
- Panel sits on brackets with 10mm spacers (air gap)
- Bolt through panel frame to brackets
- Use spring washers (vibration resistance)
Pros:
- Easy to remove/replace panels
- Air gap keeps panels cool
- Professional appearance
- Adjustable (can tilt panels if desired)
Cons:
- Higher profile (8-10cm above roof)
- Wind resistance
- More visible
Cost per panel: £30-45 (brackets + sealant + screws)
Method 2: Adhesive (Flexible Panels Only)
Process:
- Clean roof thoroughly (degreased, dry)
- Apply Sikaflex or 3M VHB tape to panel back
- Position carefully (can’t reposition easily)
- Press firmly
- Weight panel for 24 hours
- Wait 48 hours before use
Pros:
- Low profile
- Simple installation
- Less drilling
Cons:
- Can’t remove panel without damage
- Panel heats up (no air gap)
- Hard to service
- Permanent
I’ve never used this method (always used rigid panels).
Cable Routing
From panels to controller location (typically near battery).
Route options:
Option 1: Through roof vent
- Easiest if you have roof vent near panels
- Run cable through vent hole (add grommet)
- My method
Option 2: Through new hole
- Drill hole in roof (20mm)
- Fit cable gland (waterproof)
- Apply Sikaflex around gland
- Professional but more drilling
Option 3: Through existing grommet
- Many vans have wiring grommets in roof
- Add solar cable through existing hole
- Check there’s space
Cable sizing for solar:
Depends on panel wattage and cable length.
For 200W system (17A maximum):
- 2m run: 4mm² cable
- 5m run: 6mm² cable
- 10m run: 10mm² cable
I use 6mm² cable (red and black, solar-rated) for my 8m run from roof to controller. Cost: £28 for 10m.
Critical: Use solar-rated cable. It’s UV resistant (won’t degrade in sun). Normal automotive cable will crack after 2-3 years in sun.
Connecting Panels
Series vs Parallel:
Series (what I use for 2x100W panels):
- Positive of panel 1 to negative of panel 2
- Remaining positive and negative to controller
- Voltage adds: 18V + 18V = 36V
- Current stays same: 5.5A
- Power: 36V x 5.5A = 198W
- Advantages: Lower current = thinner cable, less voltage drop
- Disadvantages: Shading one panel reduces both
Parallel:
- All positives together
- All negatives together
- To controller
- Voltage stays same: 18V
- Current adds: 5.5A + 5.5A = 11A
- Power: 18V x 11A = 198W
- Advantages: Shading one panel doesn’t affect other
- Disadvantages: Higher current = thicker cable needed
My setup: Two 100W panels in series (36V, 5.5A). Works perfectly with Victron 75/15 controller.
Fusing Solar (Essential)
Where fuses go:
- Between panels and controller (positive wire)
- As close to panels as practical
My fusing:
- 20A fuse in waterproof holder on roof
- Protects cable from panel to controller
Why: If cable shorts (chafed insulation, damage), fuse blows before cable melts.
Controller Installation
Location:
- Near battery (within 2m)
- Well-ventilated (gets warm under load)
- Dry
- Accessible (for monitoring/settings)
I mounted controller on wall near battery, 1.5m away.
Connections:
Input (from panels):
- Positive from panels (fused)
- Negative from panels
Output (to battery):
- Positive to battery (fused at battery end)
- Negative to battery
Order of connection (critical):
- Connect battery first (positive then negative)
- Then connect panels (positive then negative)
Why this order? Controller needs battery voltage to initialize. If you connect panels first, controller can be damaged.
My installation (Van #4):
Time taken: 6 hours (including planning, drilling, sealing, wiring)
Components:
- 2x Renogy 100W rigid panels: £190
- Mounting brackets (8 total): £35
- Victron MPPT 75/15: £85
- 6mm² solar cable (10m): £28
- Fuse holder + fuse: £8
- Sikaflex 512 (2 tubes): £24
- Screws and fixings: £12
- MC4 connectors: £15
Total: £397
Results: Flawless installation. No leaks. Perfect performance. 18 months later, still excellent.
Real UK Performance Data (From 18 Months of Monitoring)
Let me show you actual numbers from my system across all seasons.
System: 200W panels + Victron MPPT 75/15 + 105Ah lithium battery
Location: Mix of England (Bristol area) and Scotland (Highlands), with trips to Wales
Summer Performance (June-August)
Best day (July, cloudless):
- Morning (6am-12pm): 32Ah
- Afternoon (12pm-6pm): 22Ah
- Evening (6pm-9pm): 4Ah
- Total: 58Ah (696Wh)
Battery started at 68%, ended at 100%. Generated more than I used.
Average good day (sunny with some clouds):
- Total: 42Ah (504Wh)
Covers my 60-65Ah daily usage completely.
Cloudy day:
- Total: 28Ah (336Wh)
Doesn’t fully cover usage but extends autonomy significantly.
Worst summer day (heavy clouds, drizzle):
- Total: 14Ah (168Wh)
Better than nothing but not much help.
Summer average over 45 days: 38Ah per day (456Wh)
This matches the 460Wh average I mentioned earlier.
Spring/Autumn Performance (March-May, Sept-Nov)
Best day (April, clear):
- Total: 38Ah (456Wh)
Average day:
- Total: 28Ah (336Wh)
Covers about 40-45% of daily usage. Significantly extends autonomy.
Cloudy day:
- Total: 16Ah (192Wh)
Spring/autumn average over 60 days: 26Ah per day (312Wh)
Winter Performance (Dec-Feb)
Best day (January, Scotland, -2°C, crisp clear):
- Total: 18Ah (216Wh)
Panels ice cold (good for efficiency) but only 1.5 hours useful sun.
Average winter day:
- Total: 12Ah (144Wh)
This is maybe 15-20% of daily usage with heating. Helps but doesn’t solve power needs.
Overcast winter day (most days):
- Total: 6Ah (72Wh)
Basically nothing.
Winter average over 30 days: 11Ah per day (132Wh)
Reality: Winter solar in UK is disappointing. Even 200W barely makes a dent in 75-80Ah daily usage. You’ll still need to drive every 2-3 days.
Factors Affecting Output
What makes big difference:
1. Cloud cover (biggest factor):
- Thin clouds: -30% output
- Heavy clouds: -60% output
- Rain: -75% output
2. Sun angle:
- Summer noon (50° elevation): 100% potential
- Winter noon (15° elevation): 40% potential
3. Temperature:
- Cold panels: +5-10% output
- Hot panels (60°C): -15% output
4. Dirt/grime:
- Clean: 100% output
- Light dust: -5% output
- Bird droppings: -20% output (local shading)
- Heavy dirt: -30% output
I clean panels every 2-3 months. Makes noticeable difference.
Real-World Autonomy Impact
Before solar (200Ah AGM, Van #3):
- Summer: 3 days autonomy
- Winter: 2 days autonomy
After solar (105Ah lithium + 200W solar, Van #4):
- Summer: Indefinite (solar covers usage)
- Winter: 3 days autonomy (solar extends from 2 to 3 days)
Solar added 50% to winter autonomy, made summer essentially unlimited.
Value calculation:
Summer camping: 15 nights average per summer
Without solar: Need campsite every 3 days = 5 nights @ £25 = £125
With solar: Need campsite never (for power) = £0
Annual saving: £125
System cost: £397
Payback: 3.2 years
I’m in year 2. By year 4, it’s paid for itself. Years 5-25 are pure saving.
Installation Mistakes (And How to Avoid Them)
Mistake 1: Cheap Flexible Panel
What I did: Bought £90 flexible panel thinking it was great deal
Reality:
- 15% efficiency (vs 18% for rigid)
- Delaminated after 2 years (output dropped to 60%)
- Stuck to roof (couldn’t remove without damage)
- Hot (no air circulation)
Cost: £90 wasted + effort to remove
Lesson: Buy rigid panels. Better efficiency, longer life, easier to replace.
Mistake 2: PWM Controller
What I did: Thought £25-45 PWM was adequate
Reality:
- Wasted 25% of available power
- 200W panels generating 140-150W
Cost: £70 on two PWM controllers + lost generation
Lesson: Spend £85 on MPPT. 30-40% more power forever.
Mistake 3: Poor Sealing
What I did: Skimped on Sikaflex around brackets
Result: Small leak after 3 months. Water dripping onto ceiling.
Cost: £35 to remove, reseal, repaint ceiling
Lesson: Generous Sikaflex. Waterproofing is critical.
Mistake 4: Drilling Through Roof Lining
What I did: Didn’t check depth. Drilled pilot hole too deep.
Result: Hole in ceiling lining. Had to patch and repaint.
Cost: £25 in materials + embarrassment
Lesson: Know your roof structure. Short pilot holes. Check inside before going deeper.
Mistake 5: Cable Too Thin
What I did: Used 2.5mm² cable for 200W system (10m run)
Result: Voltage drop. Lost 0.8V over 10m. Lost 5-8% power.
Cost: £28 for new 6mm² cable
Lesson: Use proper cable sizing. 6mm² for my 10m run.
Mistake 6: No Fusing
What I did: Didn’t fuse between panels and controller
Why bad: If cable shorts, no protection. Fire risk.
Cost: Lucky – no fire. Added fuse (£8)
Lesson: Always fuse positive wire from panels.
Mistake 7: Wrong Connection Order
What I did: Connected panels to controller before battery
Result: Controller error light. Freaked out. (Controller was actually fine, just confused without battery reference)
Cost: 30 minutes of panic
Lesson: Always connect battery first, then panels.
Monitoring Your Solar System
Knowing what your solar is actually doing matters.
Basic monitoring (free on most MPPT controllers):
- LED lights showing state (bulk, absorption, float, off)
- Tells you it’s working but not details
Better monitoring (£0-£20):
- Voltmeter showing battery voltage
- Approximate idea of charging
- Cheap (£8-12 for digital voltmeter)
Professional monitoring (Bluetooth MPPT controllers):
- Real-time data (voltage, current, power, energy)
- Historical data (daily/weekly/monthly generation)
- Settings adjustable via app
- This is what I have
My setup:
Victron MPPT 75/15 with Bluetooth (£85 total, Bluetooth built-in).
VictronConnect app on phone shows:
- Current generation: 48W
- Panel voltage: 35V
- Battery voltage: 14.4V
- Today’s generation: 38Ah
- Yesterday: 42Ah
- Last week: 285Ah
Brilliant. Know exactly what solar is doing.
What I check:
- Morning: Check yesterday’s generation
- Mid-day: Check current generation (making sure it’s working)
- Evening: Check total for day
Takes 30 seconds. Helps identify issues (dirty panels, shading, controller problems).
Worth paying extra for Bluetooth MPPT? Absolutely. The data is invaluable.
Maintenance (Surprisingly Important)
Solar panels need maintenance. Not much, but ignoring it costs power.
Every 2-3 months:
1. Clean panels:
- Hose with water
- Soft brush for stubborn dirt
- Don’t use harsh chemicals
- Don’t use abrasive materials
Bird droppings are worst – they shade cells significantly. Clean immediately.
Cleaning impact:
- Dirty panels: 78% output
- Clean panels: 100% output
That’s 22% power loss from dirt. Worth the 10 minutes to clean.
2. Check connections:
- Terminals tight
- No corrosion
- Cables not chafed
- Sealant still intact around roof penetrations
3. Check output:
- Compare to previous months
- Significant drop (20%+) might indicate panel damage or controller issue
Annually:
1. Reseal roof penetrations:
- Check Sikaflex around brackets
- Add more if needed
- Better to over-seal than under-seal
2. Check panel mounting:
- Bolts tight (vibration can loosen)
- Brackets secure
- No cracks in roof around mounts
3. Check cable:
- UV damage (cable going brittle)
- Insulation intact
- Replace if showing wear
My maintenance routine:
Quick clean every 2 months: 15 minutes
Annual inspection: 1 hour
Problems I’ve found through maintenance:
- Bird droppings (common – clean weekly in some locations)
- Loose MC4 connector (panel to cable connection – tightened, problem solved)
- Sikaflex crack around one bracket (resealed, no leak developed)
None of these would have been obvious without checking. All would have caused issues eventually.
Combining Solar with Other Charging
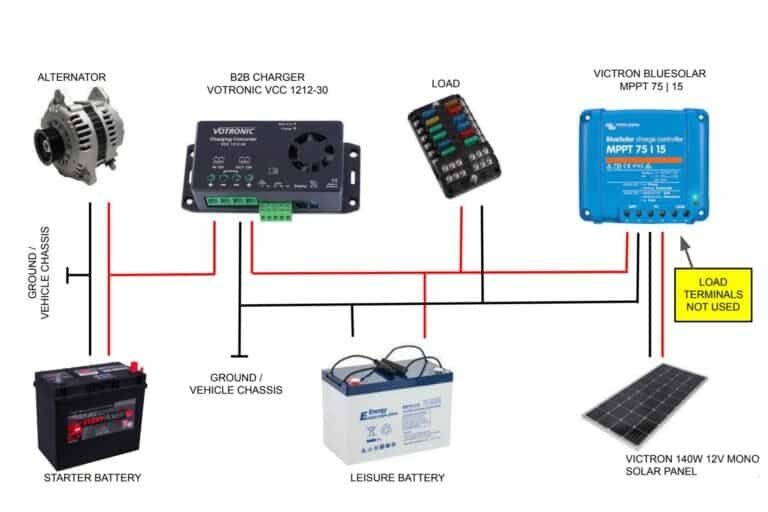
Solar is brilliant but it’s not the only charging source. My complete charging setup:
1. Solar (200W + MPPT): £265
- Summer: 100% of needs
- Winter: 15-20% of needs
2. Alternator charging (DC-DC 18A): £157
- Provides: 18Ah per hour driving
- Use: Primarily in winter
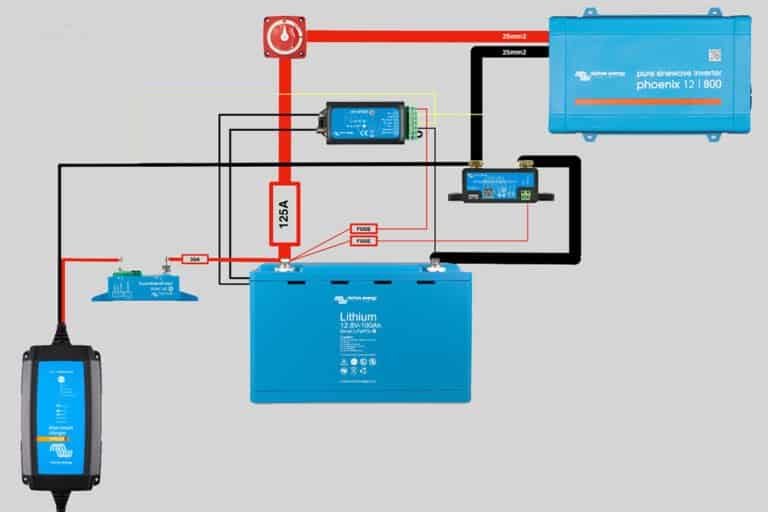
3. Mains hook-up (CTEK charger): £72
- Use: Occasionally on campsites
Total charging infrastructure: £494
How they work together:
Summer typical day:
- Solar generates: 42Ah
- Usage: 65Ah
- Shortfall: 23Ah
- Drive 1.5 hours every 4-5 days to top up
Actually, solar usually covers everything April-September. Rarely need alternator.
Winter typical day:
- Solar generates: 12Ah
- Usage: 75Ah
- Shortfall: 63Ah
- Drive 3.5 hours (63Ah ÷ 18A) or 2 hours on day 1, 2 hours on day 3
Winter needs alternator charging regularly.
System redundancy:
If solar fails: Alternator covers everything (just drive more)
If alternator fails: Solar covers summer, need campsites in winter
If both fail: Mains hook-up on campsites
Having multiple charging sources means no single point of failure.
Complete Solar System Costs
Budget System (100W + PWM) – £145-£180
For: Weekend warriors, light usage, tight budget
Components:
- 100W rigid panel: £95
- PWM controller: £35
- Mounting brackets: £30
- Cable (6mm², 5m): £15
- Fuse holder + fuse: £8
- Fixings and sealant: £20
Total: £203
Performance:
- Summer: 20-25Ah per day
- Winter: 6-10Ah per day
Verdict: Helps in summer. Barely useful in winter. PWM wastes power but keeps cost down.
Standard System (200W + MPPT) – £330-£400
For: Regular users, year-round camping, best value
Components:
- 2x 100W rigid panels: £190
- Victron MPPT 75/15: £85
- Mounting brackets (8): £35
- Cable (6mm², 10m): £28
- Fuse holder + fuse: £10
- MC4 connectors: £15
- Fixings and sealant: £35
Total: £398
This is what I have.
Performance:
- Summer: 38-50Ah per day (covers usage)
- Winter: 12-18Ah per day (extends autonomy)
Verdict: Sweet spot. Adequate power for real use. Pays for itself in 3-4 years.
Large System (400W + MPPT) – £620-£720
For: Heavy users, full-time living, maximum solar
Components:
- 4x 100W rigid panels: £380
- Victron MPPT 100/30: £165
- Mounting brackets (16): £70
- Cable (10mm², 10m): £60
- Fuse holder + fuse: £12
- MC4 connectors: £18
- Fixings and sealant: £60
Total: £765
Performance:
- Summer: 80-100Ah per day (excess power)
- Winter: 25-35Ah per day (helps significantly)
Verdict: Best solar possible for UK van. Still won’t cover winter usage completely, but maximizes solar contribution.
Three Realistic Scenarios
Scenario 1: Sarah – Weekend Camper (30 nights/year)
Usage: 40Ah daily (lights, phone charging, occasional laptop)
Solar: 100W panel + PWM controller = £145
Performance:
- Summer weekends: Solar generates 20Ah, she uses 40Ah = needs to drive or use campsite every 2-3 days
- Acceptable for occasional use
Verdict: Basic solar helps but not essential. Could skip solar and just use alternator charging.
Scenario 2: Me – Regular User (80-100 nights/year)
Usage: 65Ah daily (lights, fridge, laptop, water pump)
Solar: 200W panels + MPPT = £398
Performance:
- Summer: Solar generates 38-50Ah, covers 60-80% of usage = nearly indefinite autonomy
- Winter: Solar generates 12Ah, covers 15-20% = extends autonomy from 2 days to 3 days
Verdict: Essential. Transforms summer camping. Helps significantly in winter. Paid for itself in 3 years.
Scenario 3: Tom & Lisa – Full-Time (300+ nights/year)
Usage: 85Ah daily (lights, fridge, laptop, phone, water pump, occasional inverter)
Solar: 400W panels + MPPT = £765
Performance:
- Summer: Solar generates 80-100Ah, covers 95-115% = indefinite autonomy, slight excess
- Winter: Solar generates 25-35Ah, covers 30-40% = extends autonomy from 2.5 days to 4 days
Verdict: Necessary. Maximum practical solar for UK. Still need alternator charging in winter but solar contribution is significant.
Common Questions (From Experience)
Q: Can I install solar myself?
Yes. I did. If you can use a drill and crimper, you can install solar. Takes 4-6 hours.
Q: Will solar keep my battery charged if I don’t use the van for weeks?
Summer: Yes, easily. My van sits for 2-3 weeks sometimes. Battery stays 100%.
Winter: Depends. If you have parasitic draws (alarms, trackers), maybe not. My battery drops 5% per week in winter with solar.
Q: Do I need planning permission for panels on my van?
No. It’s a vehicle modification, not a building.
Q: Can I run 240V appliances from solar?
Only with an inverter, and inefficiently.
Example: 600W inverter from solar
- Panel generates: 200W
- Battery: 105Ah @ 12V = 1260Wh stored
- Inverter draws: 50A @ 12V for 600W output
- Runtime: 1260Wh ÷ 600W = 2.1 hours maximum
Solar generates slower than inverter consumes. You’ll drain battery.
Better: Use 12V appliances. Much more efficient.
Q: What happens in winter when panels are covered in snow?
They don’t generate. Snow must be cleared. I brush snow off panels (it’s usually not that stuck).
Q: Can I tilt panels to catch more sun?
Yes, but complicated. Requires hinged mounting. I keep mine flat (simpler, lower profile). Loss is maybe 15-20% efficiency but worth it for simplicity.
Q: Will partial shading ruin output?
Yes. Shading even 10% of one panel can reduce output 40-60% (cells are in series).
Panel placement: Avoid areas that get shaded by roof vent, satellite dish, roof bars.
Q: How long will panels last?
Rigid panels: 20-25 years (gradual degradation to 80% of original)
Flexible panels: 5-8 years (often fail sooner from delamination)
I’m 3 years into rigid panels. Still 95%+ of original output.
My Final Recommendations
After three solar installations, £185 in wasted components, and 18 months of detailed monitoring:
For most people (regular campers, 50-100 nights/year):
Buy 200W rigid panels (2x100W) + Victron MPPT 75/15.
Components:
- 2x Renogy 100W rigid panels: £190
- Victron MPPT 75/15 (Bluetooth): £85
- Mounting brackets: £35
- 6mm² cable: £28
- Fuse holder: £10
- MC4 connectors: £15
- Fixings/sealant: £35
Total: £398
This gives you:
- Summer: Near-indefinite autonomy
- Winter: Extends autonomy 50%
- Payback: 3-4 years
- Lifespan: 20+ years
This is exactly what I have. Zero regrets.
For light users (weekends only, 20-40 nights/year):
Consider skipping solar entirely. Use alternator charging + occasional campsite.
Or buy 100W panel + basic MPPT (£180 total) for summer help.
For heavy users (full-time, 200+ nights/year):
Buy 300-400W panels + Victron MPPT 100/30.
Maximum practical solar for UK van. Won’t cover winter completely but maximizes contribution.
Total: £620-£765
Final Thoughts
Solar in the UK isn’t perfect. You won’t get the performance marketing promises. Winter output is disappointing. You’ll still need other charging methods.
But summer solar is brilliant. May-September, my 200W system covers 100% of my power needs. I can wild camp indefinitely. No campsites. No driving for charging. Just free solar power.
That’s worth £398 to me. Paid for itself in saved campsite fees in 3 years. Years 4-25 are pure saving.
If I built van #5 tomorrow, I’d buy exactly the same system. 200W rigid panels. Victron MPPT. Proper mounting. That’s the sweet spot for UK vanlife.
Now stop reading, buy some solar panels, and enjoy free power for the next 20 years. Just don’t expect miracles in December.


